
DIY fence
Man is created in such a way that he will never feel completely safe. There is always a small loophole for the mind, which is just waiting to unfold to our eyes various, sometimes even daring, scenarios of future events. Some echoes of the past. Actually, a saber-toothed tiger is not chasing? And that means there is no danger. But still scary and fantasy is an enemy.
Our ancestors were not up to such conversations. Every day they had to fight to survive, to seek shelter, medicine, and food. Sometimes the life of a whole group depended on the skills of the main, clear dispersal of power and strengthening borders. The only shelters were cold caves. The entrance of which was littered with improvised material and stones. That is where this feeling comes from. Fear that prevails over logic.
A little later, when people changed their minds and set about worldly work, there was no longer any need to behave in this way. There was a speech, writing, painting. People began to raise cattle, erect a culture, built houses with a wooden fence from a nearby forest, which served as a reminder that the entrance is by invitation only, to develop and believe in a good future.
Different options for a wooden fence:
To this day, a wooden fence is a symbol of “my” territory, a means for marking borders. Its construction is not as difficult as it seems. Only building materials, tools, straight arms and skills are needed - the basic elements, like an alchemist.
The basis of any fence are:
- wooden poles, with a diameter of 80-100 mm;
- bars with a section of 40x60 mm;
- edged boards.
Edged boards form the basis - the canvas of the fence. The canvas can be of several types:
Classic is the simplest design. Simple installation and installation. Pillars are mainly made of wood or steel, profile pipe, which are installed in a concrete base to a depth of 1 to 1.5 m;
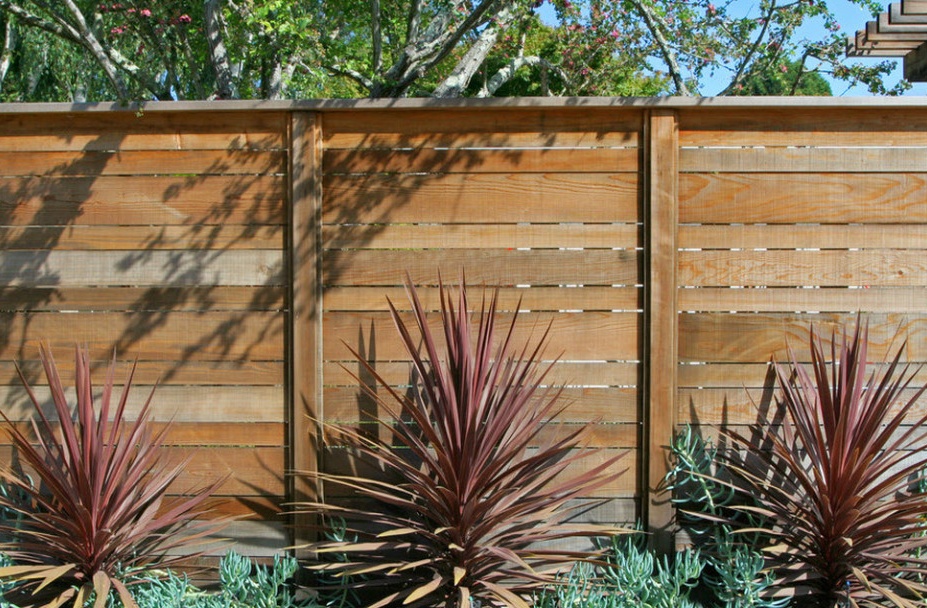
Ladder or Christmas tree - the canvas, in comparison with the classics, is mounted in a horizontal position with a slight overlap. It turns out a stepwise pattern. A herringbone-type wooden fence turns out to be deaf: without any gaps. This has a very good effect on sound insulation, protects from prying eyes and dust. The edges of the canvas are attached to the pillars of wood or steel profile pipe;
Cross - supporting structure made of decorative reinforced concrete, brick, stone;
Chess - the supporting structure is made similar to the previous version, but the canvas is made by analogy with a chessboard. Between the cells leave a small clearance. In addition to fastening to the supporting structure, the canvas is held on horizontal veins;
Lattice - the canvas of the fence resembles a lattice when the distance between the elements is equal to the length of the element itself. This type of wooden fence is rarely used. More often in this design you can find a welded or forged fence. The canvas can be either vertical with an inclination, or horizontal.
Necessary tools for the construction of a wooden fence:
- saw;
- hammer;
- ax;
- nail clipper;
- shovel;
- strong, thin cord;
- long tape measure.
It is very important before the procedure for installing wooden, supporting poles, to carry out preliminary processing: the lower part is impregnated with heated bitumen. This will protect the tree from decay and increase the service life by 2-3 times.
Consider a good example in the video.
To begin with, it is worth noting the corners with the help of long bars firmly hammered into the ground. A rope is pulled between the bars along which pegs - marks are driven in. The distance between should not exceed three meters. After the posts are driven in, it is necessary to dig support pits with a depth of at least 50 cm. If the fence is planned to be about two meters high, then the depth should be twice as large, that is, about 100 cm.
What foundation can be used?
Tape.It is a strip of reinforced concrete around the perimeter. For laying the strip foundation, a pit with a depth of 30 to 150 cm is dug. Wet sand is laid at the bottom of the trench. Fittings are knitted, and formwork for the foundation is installed. It must be borne in mind that the foundation will protrude slightly above ground level. After installing the pillars, everything is poured with mortar to the level of formwork.
Pillar. With the help of a garden drill, a hole is dug from a depth of one to one and a half meters. The diameter of the pit should be 15-30 centimeters larger than the diameter of the column. Wet sand and gravel are placed in the dug holes. After that, the poles are installed and poured with a mixture of concrete.
Concrete hardens from 3 to 7 days. Depending on weather conditions.
Installation of beams and canvas
Cross beams are the main part of the wooden fence on which the canvas is attached. If the poles are wooden, then the beams are fastened with nails. If metal, then the metal corners are first attached and the beams already lie on them and beat. There must be a gap between the boards. Under the influence of precipitation, the tree will swell and if there is no gap, then the fence will skew forever. After installing the boards, the surface is treated with drying oil or paint. A wooden fence requires constant care, otherwise it quickly deteriorates, darkens, begins to rot, and, in the end, crumbles before our eyes. The place where the fence will stand must be cleaned of vegetation and anthills. Every year or two, the protective coating of the fence (varnish or paint) should be updated.

