Content
Before talking about rack ceilings, it is necessary to turn to the history of their occurrence. The beginning of the 90s can be safely called the period when European-quality repairs have firmly entered into fashion. It was during this period that the first aluminum rack ceilings supplied by Germany and differing, like any new product, in considerable cost, appeared on Russian markets. Innovation was appreciated, and the popularity of such ceilings increased every day. Due to its main characteristics, this material has become widely used in the repair of kitchens and bathrooms. Over time, manufacturers began to produce both standard white ceilings, and with all kinds of color inserts. This made it possible to create not only practical-equipped premises, but also to preserve the integrity of design solutions.
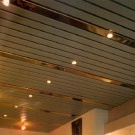
A rack metal ceiling is a fast, practical and aesthetically attractive way to decorate ceilings in an apartment. High strength, moisture resistance, durability, as well as a large selection of textures and colors will help create a modern and unusual interior of any room.
This type of ceiling decoration is used in residential and public buildings, it is widely used in industrial facilities and even in transport. Like any other type of suspended ceiling, it is able to hide surface defects, wiring, communications, sound and heat insulating materials.
Advantages of a rack ceiling
- the possibility of use in rooms with high humidity;
- has a fairly high impact resistance;
- durability: steel and aluminum panels do not rust, do not fade in the sun. such a ceiling will last more than 25 years.
- the possibility of combinations, a variety of species in color, shade and texture will help to create a unique design;
- environmental friendliness: in the manufacture of panels I use environmentally friendly materials, so they are safe for health;
- the rack metal ceiling does not rot, does not accumulate dust, and is also easy to care for;
- high fire resistance indicators allow their use in places with high fire safety requirements. At high temperatures, the panels do not emit toxic substances;
- like any type of suspended ceiling, allow installation fixtures and various climate systems;
- installation takes several hours and does not require preparatory work: leveling with plaster, primer, etc.
Types of Slatted Ceilings
The rack metal ceiling can be of two types:
Rack ceiling design
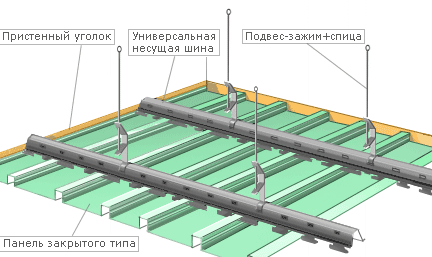
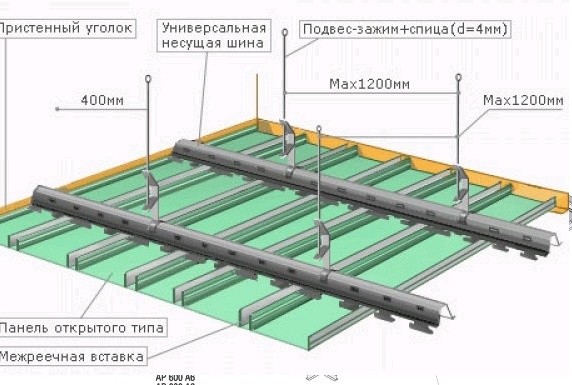
Rack panels are produced in the form of an aluminum sheet with a thickness of up to 0.7 mm and a width of 50-200 mm with various types of decorative coatings. The length of the panel is 3-4 m, but there are other custom sizes. The front part of the panel is painted in accordance with the international “color” RAL table. Not the front part is coated with a primer or varnish (5 microns). Each panel has "combs" with the help of which there is fastening to the guides. To the supporting structure, the ceiling is mounted on spring suspensions. The design of the slatted ceiling around the perimeter is framed by a PL profile and RPP * 18 (U-shaped profile). The front part of the panel is painted in accordance with the international “color” RAL table. Not the front part is coated with a primer or varnish (5 microns).
Device and installation of a rack ceiling
Ceiling rails are mounted with the help of so-called “cloves” located on an aluminum or steel traverse. Each rail assumes the presence of certain traverses. To avoid defects, you should buy both rails and traverses of the same brand.
Installation of a rack ceiling is quite simple and does not require special knowledge and skills. Following the instructions below, you can easily assemble such a ceiling yourself. It should be noted that the ceiling installation should be carried out last, when all repair and construction work is completed. If there is an electric cable on the ceiling, care must be taken that it does not interfere.
The following tools will be required:
- level and laser level;
- roulette;
- screwdriver;
- drill;
- scissors for metal;
- material needed:
- rack ceiling;
- profile;
- screws and dowels;
- suspensions;
- traverses.
Ceiling installation begins with the installation of rails. They are attached around the perimeter of the room. Next, they mark the place of the future ceiling, which will be located below the old one by 15-20 cm. The next step is metering. If installation work is carried out in a large room, then use the laser level. A horizontal line is drawn along which profiles will be mounted. The length of the standard profile is 3 m. If a profile of a shorter length is needed, it can be cut using scissors for metal.
Along the previously drawn line, a guide profile is applied to the wall surface, and then a hole is drilled. A screw with a dowel is screwed into the hole. So the whole profile is attached. The pitch should be 50-60 mm. After that, the level checks whether the profile is evenly fixed. In the corner, the profiles must be connected and checked by level. It should be the perimeter of the room.
Now measurements are made for installing suspensions. The distance between their fasteners is approximately 1 m. The suspensions are fixed with screws and dowels. The position of the installed suspensions is also checked by level. Traverses are attached to the suspensions at a distance of no more than 1 m.
Traverses should be located perpendicular to the rails and be at the same level as the perimeter profile. With a screwdriver they are attached to the suspensions. It is very important to mount a flat surface without defects. This will appear on the appearance of the ceiling.
Traverse may be of insufficient length. In this case, it can be added. To do this, the gimbal is attached at the beginning of the next traverse, and the second traverse goes butt with the first. Having installed the traverses, you can begin to assemble the ceiling.
Next, the protective film is removed from the rails, and then they are cut in accordance with the size of the room. The slats must be placed in the guides and clicked along the entire length of the beam.


Ceiling skirting - the right choice to complete a quality repair
Stretch ceilings: photo for the hall - chic opportunities for decorating a modern living room
Stretch ceilings for the kitchen: photo-ideas of an attractive arrangement of the room
Two-level ceilings: modern design in the most interesting finishes
Mirror ceilings: varieties, advantages, examples of use in interior design
Stretch ceilings for the bedroom: varieties of design, color, texture
Ceiling in a wooden house
False ceiling in a modern interior
Ceiling Design - Original 2016 Ideas
Features of the choice of material, shade and other qualities of the ceiling in the bathroom
Ceiling Design 2015: Current Trends
Wood ceiling
Black (dark) ceiling in the interior for extraordinary personalities
Plasterboard ceiling in the kitchen
Contemporary ceiling design in the living room
Modern bedroom ceiling design
Which ceiling to choose
Modern methods of decorating the ceiling in the house
Contemporary ceiling design in the kitchen
Ceiling beam in the house
Disadvantages and problems of suspended ceilings
Features of Stretch Ceilings