
Methods for laying tiles on the wall
An important point is the choice of the starting point of work. As a support for the tiles, you can use a metal profile or wooden lath, you should also carefully plan the location of the tiles. Since the walls may not be completely even, for a start it is necessary to draw a horizontal guide line along which a support bar is nailed to support and guide the first row. Then, on each side, the numbers of rows of tiles are marked out vertically. At the edges of the windows and at the outer corners, it is advisable to put only whole tiles, so before you start laying, you should determine the location of the tiles.
There are several options for laying tiles on the wall:
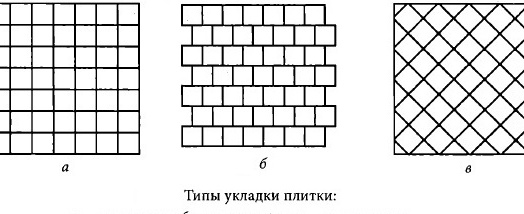
- “Seam to seam” - with this laying option, rows perpendicular to each other (horizontal and vertical) are formed. It is worth noting that with this method of laying, the tile should be with the smallest error.
- "Dressing" in this case, the seam of the lower row should coincide with the middle of the tile of the upper row. In this way, tiles are laid only in horizontal rows, but in contrast to the “seam to seam” option, the process is much easier, since vertical deviations are not so noticeable.
- “Diagonally” is the most complex way of laying, most often used when facing a large surface. Tile joints form between themselves strictly perpendicular lines. With the floor, the seam line should form 45about . Work begins with the installation of lighthouse tiles. The level sets the horizontal direction and the plumb line - vertical. It is recommended to lay lighthouse tiles on glue, which hardens much faster than cement mortar. The tiles begin to be laid from the bottom up. A support rail is installed at the bottom of the wall, and at least 2 meters long at the edges of the facing surface of the plumb rail. Then a horizontal cord is pulled between the side rivers along which horizontal rows of tiles are fastened.
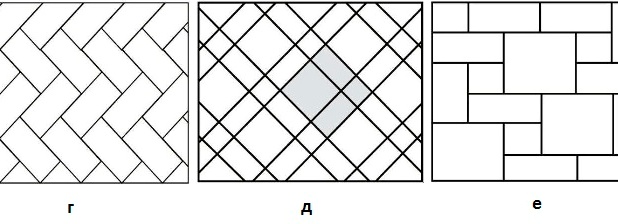
Less popular and non-standard ways of laying tiles on the wall
- “Modular grid” is a more complex option, which is perfect for small rooms and rooms. First you need to choose the pattern and color of the material. It is advisable to draw a drawing of the pattern, where the dimensions of the seams and tiles should be indicated.
- "Herringbone" is considered a non-standard option for laying tiles on the wall. It is not so often seen in the room, as, for example, “seam to seam”, but this method has its own “charm”. The process of laying the “Christmas tree” is visually similar to the technology of laying parquet. In this case, it is necessary to use only rectangular tiles. This way of laying perfectly decorates rooms with irregular geometric shapes. Although more often a “herringbone” decorates the floor of the room, it can also be used on the wall, but it is important to fit into the overall design of the room.
Glue for tiles and seams
For beginners, it is recommended to use a thin layer of glue when facing, the desired thickness is obtained by using a notched trowel. If the tile size is 15 by 15 cm, use a spatula with a tooth depth of 6 mm, with a tile size of 30 by 30 cm - 9 mm. Do not worry about the poor adhesion of the tile to the surface due to the small adhesive layer, the main thing is to choose the right glue (it all depends on the surface being finished: plaster, drywall, etc.). The surface under the tile should be flat, but not smooth as glass, so that the glue can "seize".
When using small tiles, joints are narrower than when using larger tiles. But the seams should not be already 2 mm (since it will be difficult to fill them with mortar) and no wider than 10 mm (wide joints will lead to shrinkage and cracks). But there is also a seamless or tified one (obtained as a result of trimming the edges on special equipment).But usually this tile is used only when facing floors.
Various patterns
Even the simplest tiles can be made beautiful decor: You can experiment with the color, size and orientation of the tiles. For this, simply lay the tile on a flat surface, so to speak, "dry." Same when choosing it is recommended to choose tiles of the same thickness - this will greatly facilitate the laying process. Also, one should not forget that the tile may have rectangular edges or more “wavy”. The complex use of such tiles will lead to difficulties in work, therefore, to facilitate this laying process, use a more viscous solution.